Here’s a picture of my Work Space.

I am going to clear out the Kitchen in a bit when I receive the Shelves from Amazon. Of course, that’s not to say that it won’t get filled up again!!!… 😲🤣🤭
Facebook Comments Box

Here’s a picture of my Work Space.
I am going to clear out the Kitchen in a bit when I receive the Shelves from Amazon. Of course, that’s not to say that it won’t get filled up again!!!… 😲🤣🤭
Just finished the Port side of the Gun Deck. I need some more Xacto Razor Blade for the bigger Handles.
Also, I set up another Lifetime Portable Table to have room to work. And it allowed me to set up a Cutting Pad on it.

I ordered some Shelves from Amazon but it won’t arrive until 10/22/21. After I get the Shelves, I can clean out the junk in the Kitchen and put them out in the Garage.
I had some pieces break off. I tried using my old Maple Stain, but it solidified with age so I need to buy some more Stain as well.
I was just thinking to myself that this is the biggest Model that I’ve ever done. But that isn’t necessarily true. Because I built Belem, which has around the same length. This one has a longer Bowsprit and Boomkin.

Since this is going to be a lower deck is only visible, looking into the Gun Ports, I am not including much detail work on this level. I mean… What’s the use of it’s not visible, right??? .. 🙄


The way I glued the 2 halves is with my combo of Contact Cement to grab it, White Glue in the center joint. Then after I join it, I dribbled SuperGlue on the joints to strengthen it.


The instructions called for using Contact Cement but I found White Glue is easier and less messy.
Here’s the Instructions…


Obviously this is a what is called a “Plank on Bulkead” type of Ship Model. Where you lay the Planks across the entire Hull structure of the Ship.


After sliding the Bulkheads in, which they slid in beautifully, by the way… Usually these kits are far from “Exact” on their cutting. This one by Occre is good though.

This Basswood strip is for stabilizing the Bulkheads to one another.
My first problem just came up though. It just occurred to me that I need a Jig to hold the False Keel straight while I am able to get the False Keel straight while the glue has time to set.
The False Keel is bent a bit, but I don’t think it will be a problem because I’ll use the Jig and the forcing by the Planks that I glue in the future to hold it straight. It won’t take but about 2 or 3 Planks to be able to do that

Not the worst Warp I’ve seen though… 🙄🤔😫

I was just looking ahead at the Instructions. On this ship, they have you building it from the Top Down. I think I’m going to start it from bottom up though.

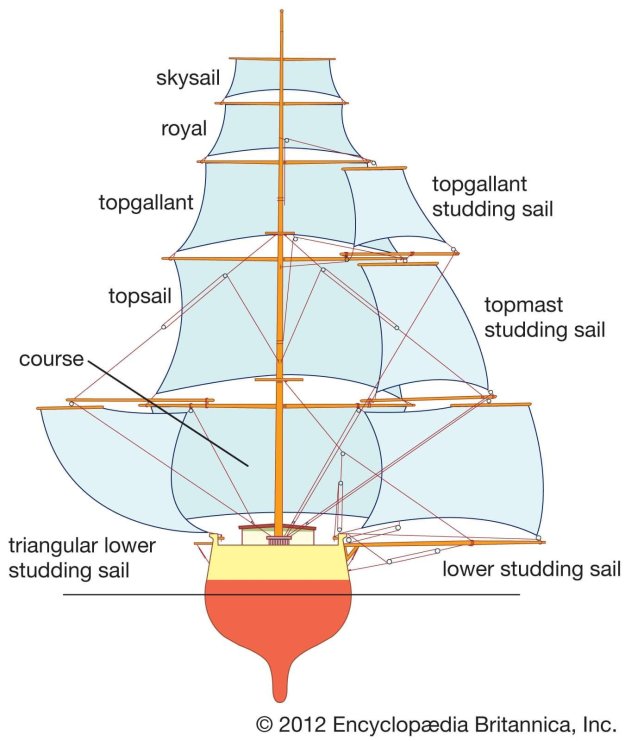
Studding Sails
A studding sail, or stun’sl(pronounced stuns’l /ˈstʌnsəl/) is an extra sail on a square rigged vessel for use in fair weather. It is set outside the square sails, using stun’sl booms which run out along the yards.
It is named by appending the word studding to the name of the working sail alongside which it is set, for example, “fore topsail studdingsail”
The origins of studding sails are relatively uncertain. The earliest reference is in 1655, but precise information on how these early examples were rigged is unknown. It is not until 1790 that this is available. Some changes in the detail of design and usage occurred over succeeding years.
All ordinary working square-rigged vessels were usually fitted out to set stun’sls by the start of the 19th century. This started to change in the last quarter of the 19th century. As steamers took over routes and cargoes that needed fast passages, sailing vessels competed by being able to cut costs much more easily. Crew sizes were reduced, so there were fewer experienced hands to set and take in stun’sls. Any ship which pressed on in rising winds risked breaking a stun’sl boom or damaging sails–if the owner had all or some of the stun’sls sent ashore, there was less to break and these repair costs avoided. Clippers on the routes to China continued to race against each other with large crews and full suits of sails (which included stun’sls) until they also had their trade taken over by steamers in the years following the opening of the Suez Canal in 1869. As these ships took other routes, most of them had the same economies applied.
Info Wikipedia




Here’s an excellent shot!!! ..

Laying out the False Keel. I noticed that there was a good amount of Warping in the wood, especially in the Stern section.


I applied Dap Weldwood Contact Cement to the joints using a Q-Tip. Then you wait 5-10 minutes.


I used Titebond Translucent Wood Glue to glue the support pieces on either side.


The False Keel has a warp to it on the Stern end but I’m not worried about it.
I finally figured out what’s going on with the Instructions. I found the Parts Index inside the Instruction Book…


There are also a Parts Index as well.
This Model is rated for Expert Model Makers.
I made this Video about opening up my Kit.
The Comment I made in the YouTube Video was this –
I bought this model back in January 2021. I am only just getting around to starting it. I bought it from Premier Ship Models based out of England. I bought it on January 3rd. It’s supposed to cost around $750 bucks but they had it for $445 plus $46 shipping. It took a little while to be delivered, which is okay because I wasn’t in any hurry. It was actually in back-order and I had to wait for the factory in Barcelona to put the kit together before Premier Ship Models sent it out to me.
The Nuestra Señora del Pilar de Zaragoza is a galleon of Manila. These being the ships that covered the Spanish trips between the Philippines and America through the Pacific Ocean .
It was built in Cavite in 1731 and was enlisted in 1733, being the twin of the ship Nuestra Señora de Covadonga, which had a similar mission. She left on August 1, 1750, in Manila, under General Martinez de Faura. On August 28, 1750, the ship was overloaded with boxes of contraband in the port of San Jacinto (Island of Ticao) and departed on September 1, without anyone knowing more about her.
The ship had capacity for 22 guns of 18 pounds, 22 guns of 14 pounds, 6 guns of 10 pounds and 10 pedreros of 2 pounds. It was 34 meters long, 9.5 meters wide, had a draft of 5 meters, displaced a thousand tons and housed a crew of 460 men. At the time of his last departure he had 2 18-pounder guns in the first battery, 22 10-pounder guns in the second, 6 6-pounders in the quarterdeck and 10 pedreros in poop and castle. In 1733 the name was not given to the ships, so that instead of the name had a shield of the city of Manila.
The construction of this ship, based on plans and regulations established by JosT Antonio de Gaztaneta, took place in the Port of Cavite, in the Philippines, along with that of Nuestra. Sra. de Covadonga. Work began in 1731 and she was finally launched two years later in 1733. She had two bridges and a displacement of 1,000 tons, was fitted with 50 cannon as well as 10 swivel guns, mounted on quarter deck and forecastle. For twenty years she plied the route from Mexico to Manila and in 1750 underwent a complete refit in the Port of Cavite. In 1750, on her last voyage, she set sail from Manila bound for Acapulco. Despite being overloaded, and contrary to the opinion of both pilots and Master, her Captain insisted on weighing anchor at the beginning of September. En route for the Mariana Islands, in the Pacific, they began to have difficulties, after sailing into a heavy storm, and she sank taking all of her crew down with her.


