Making some Wood Putty by mixing Saw Dust and White Glue.

Facebook Comments Box

Making some Wood Putty by mixing Saw Dust and White Glue.
My previous Post was getting kind of long for closing up the Hull so I made a new Post.

I’m doing one side at a time because it’s all precision Plane-ing, Sanding to fit each Strake.
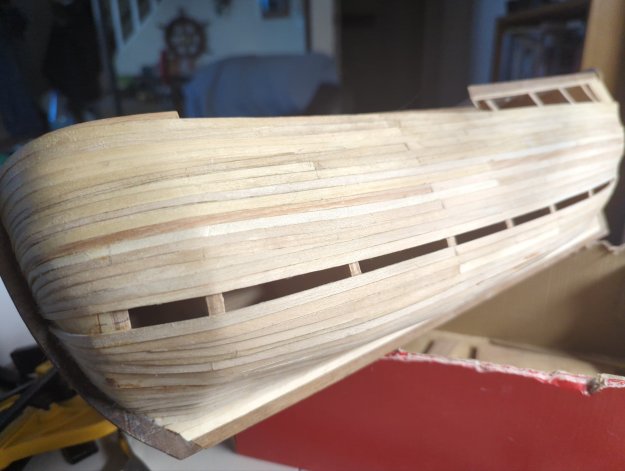
All the hard part is completed and I will miss this particular Phase of Ship Building, which is the Planking.
I realize that I have a few mistakes. .. Broken Planks, etc. But it all gets sanded down and the next Planking will cover it all.
Next is the Wales and upper Deck. 🤔🙄👍

I hate it when I miscalculate like this!!! .. 🙄🤔😫
I used to agonize when I first started out. I belong to several Model Ship Building Groups on Facebook and I often see guys who agonize over the smallest thing. Like being 1 mm off for example. I just shrug my shoulders. You just have to have a lot of patience and make the best of any mistakes. Shoot, you wouldn’t be a very good Ship Builder if you don’t make mistakes. That’s how you learn, right?
For my Wales, I’m thinking about trying out Glycerin and Hot Water to bend the Wood, as it’s a hard wood.
It really annoys me that I made a mistake on this Strake. I woke up and I decided to glue it. .. BEFORE Coffee!!! .. Well, I had it tapered and Pre-Bent for the Starboard side!!! .. Anyway… No biggy. .. Doesn’t look too bad. . 🤔🙄
Planking always seems like a journey to me… You take 1 Step at a Time…

I skipped over #18 on this side because of my previous screw-up.. .
Still turned out good. I used Contact Cement and Superglue for the very forward part that Bends around the Bow White Glue for the rest.
I was thinking to myself that in the next build, I’m going to shape some Balsa Wood between Bulkheads #1 and #2. I hate it when the Strakes go flat between those 2 Bulkheads. 🤔🙄😫


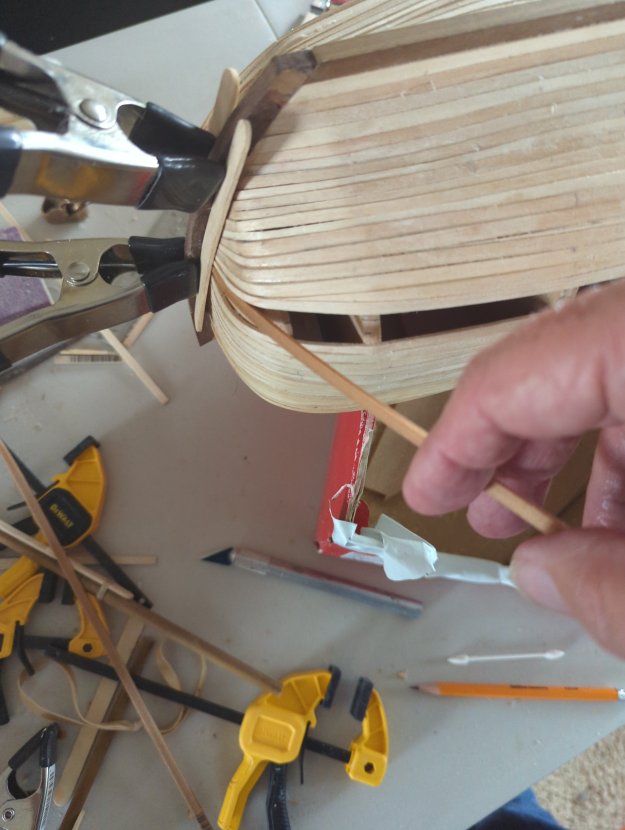
That piece of Wood jammed in there is my Pre-Bent Strake that I will shape to go into that hole…


👍😆🎉
After a lot of messing around, I have finally added Facebook Commenting on my Posts.
Everybody is welcome to Comment on my build. Ask questions, suggest advice, etc.
Thank you. ..
Roland
Now I’m closing up the Hull which gives me a bit of nostalgia. I’m glad I made this Blog to keep track of my builds. 🤔🙄👍
I found that I have a little Gap in the Bow section which I’m fixing to close up.

Plane-ing the Strake from 5 mm down to 2.5 mm using my Ibex Plane. ..

I use these Clamps which allow me to stick the Strake into the hole and bend them around.

Applying the Iron to it prevents it from Cracking. I only use what works (for me) .. 🤔🙄👍

I’m just pre-bending these Filler Planks because the gap is odd. 🤔🙄😫

Closing it up is always melancholy. 🤔🙄.. For me anyway. Because after you do the Hull, you go on to a whole another Phase in the build. Which is one of the things that I love about this hobby.


I kind of screwed up and left around .5 mm Gap excess that I will have to fill so I am gluing a little 1 mm Strip that I will plane and sand down. 🤔🙄


That’s why I made these Pre-Bent Strakes to use as Fillers because I miscalculated by 2mm .. 🤔🙄😫

Endeavour was originally the merchant collier Earl of Pembroke , built by Thomas Fishburn for Thomas Millner, launched in June 1764 from the coal and whaling port of Whitby in the North Riding of Yorkshire. She was a type known locally as the ‘Whitby Cat’. She was ship-rigged and sturdily built with a broad, flat bow, a square stern, and a long box-like body with a deep hold.
A flat-bottomed design made her well-suited to sailing in shallow waters and allowed her to be beached for loading and unloading of cargo and for basic repairs without requiring a dry dock. Her hull, internal floors, and futtocks were built from traditional white oak, her keel and stern post from elm, and her masts from pine and fir. Plans of the ship also show a double keelson to lock the keel, floors and frames in place.
There is uncertainty about the height of her standing masts, as surviving diagrams of Endeavour depict the body of the vessel only, and not the mast plan. While her main and foremast standing spars were standard for her shipyard and era,[16] an annotation on one surviving ship plan in the National Maritime Museum in Greenwich has the mizzen as “16 yards 29 inches” (15.4 m). If correct, this would produce an oddly truncated mast a full 9 feet (2.7 m) shorter than the naval standards of the day. Late twentieth-century research suggests the annotation may be a transcription error with “19 yards 29 inches” (18.1 m) being the true reading. If so, this would more closely conform with both naval standards and the lengths of the other masts.[15
I do realize there is a whole other numbering convention for Strakes, but I just went with my own instead. It gets too confusing for me using Letters. 🤔🙄😲
In boat and ship construction, strakes immediately adjacent to either side of the keel are known as the garboard strakes or A strakes. The next two are the first broad or B strake and second broad or C strake. Working upward come the bottom strakes, lowers, bilge strakes, topside strakes, and uppers also named sequentially as the D strake, E strake, etc. The uppermost along the topsides is called the sheer strake. Strakes are joined to the stem by their hood ends.
A rubbing strake was traditionally built in just below a carvel sheer strake. It was much less broad but thicker than other strakes so that it projected and took any rubbing against piers or other boats when the boat was in use. In clinker boats, the rubbing strake was applied to the outside of the sheer strake. Many current pleasure craft reflect this history in that they have a mechanically attached (and therefore replaceable) rub rail at the location formerly occupied by a rubbing strake, often doubling to cover the joint between a GRP hull and its innerliner. Inflatable dinghies and RIBs usually have a rubbing strake (typically a glued-on rubber extrusion) at the edge.
A “stealer” is a short strake employed to reduce the width of plank required where the girth of the hull increases or to accommodate a tuck in the shape. It is commonly employed in carvel and iron/steel shipbuilding, but very few clinker craft use them.


I found those Clamps work really well for holding the Strakes down on the Stern Post.

Hmmm… There’s a bit of a Gap from where #15 left off and where #16 joins it. Nothing that a little Sawdust and Glue won’t fix. I’m old school… 🤔🙄👍

Looks like I’m going to have to tuck the #16 in after I shape the front portion of it with a point.


I only had the Wood soaking for around an hour. It easily bends around the Stern Section no heat needed. 🙄🤔
Hmmm… I can’t find anything that will Clamp down on the Stern bit of 17 so I’m going to use Contact Cement and Superglue…


Don’t laugh! Contact Cement and Superglue works great! .. Of course the Superglue is applied after, into the cracks.. 🤔🙄
Even though it’s Superglue, I still let it harden before continuing…

I put a Wedge in to push #7 up against #16.

I was debating how I should do this next bit. .. I decided to use Superglue for the very forward part of the #15 Strake. I also tapered to a point so that I’ll only have 4 Strakes going through the Channel in the Stern.


As I get closer to closing up the Gap, I will start using combinations of Glues…
I have 4 Planks left to go before closing her up. Should be able to get ‘er done in a few days… 🤔🙄👍

I got this little Tool Cart from Michaels. It works pretty well for holding all the Pliers, Clippers, Files, little Tools in general…


