Tag Archives: Philosophy

Closing Up the Hull Part 2

My previous Post was getting kind of long for closing up the Hull so I made a new Post.

Port side

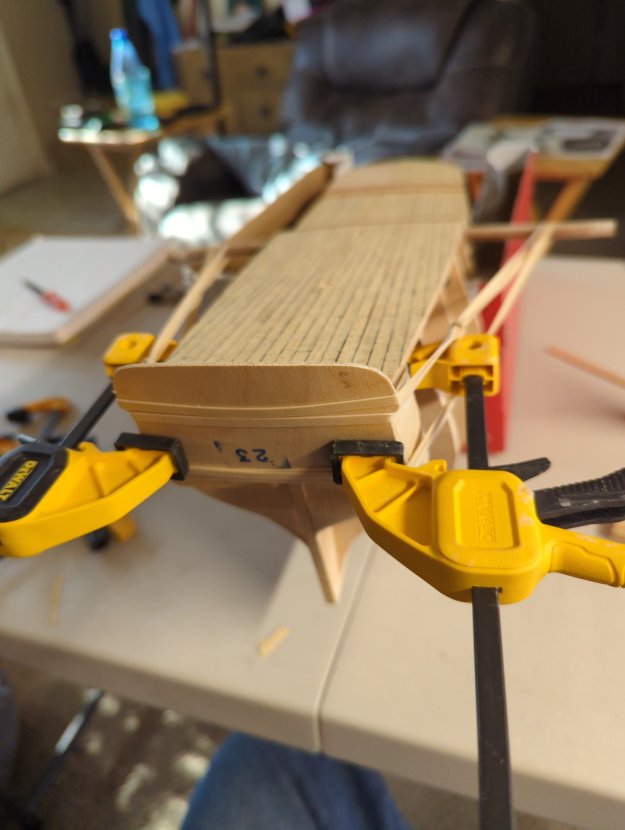
I’m doing one side at a time because it’s all precision Plane-ing, Sanding to fit each Strake.

All the hard part is completed and I will miss this particular Phase of Ship Building, which is the Planking.

I realize that I have a few mistakes. .. Broken Planks, etc. But it all gets sanded down and the next Planking will cover it all.

Next is the Wales and upper Deck. 🤔🙄👍

Improvising

I hate it when I miscalculate like this!!! .. 🙄🤔😫

I used to agonize when I first started out. I belong to several Model Ship Building Groups on Facebook and I often see guys who agonize over the smallest thing. Like being 1 mm off for example. I just shrug my shoulders. You just have to have a lot of patience and make the best of any mistakes. Shoot, you wouldn’t be a very good Ship Builder if you don’t make mistakes. That’s how you learn, right?

For my Wales, I’m thinking about trying out Glycerin and Hot Water to bend the Wood, as it’s a hard wood.

#18 Port side done

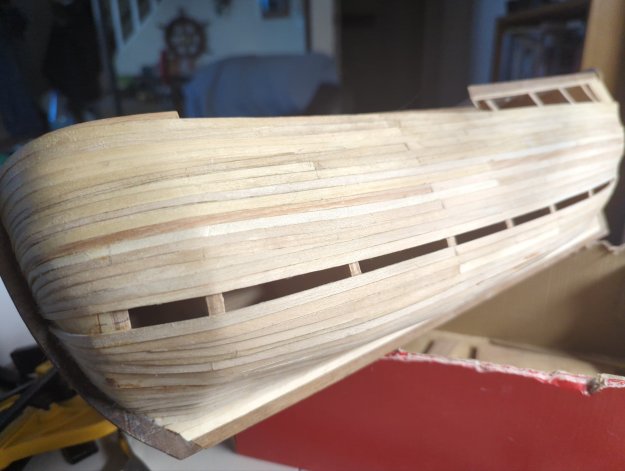
It really annoys me that I made a mistake on this Strake. I woke up and I decided to glue it. .. BEFORE Coffee!!! .. Well, I had it tapered and Pre-Bent for the Starboard side!!! .. Anyway… No biggy. .. Doesn’t look too bad. . 🤔🙄

Planking always seems like a journey to me… You take 1 Step at a Time…

#19 Strake

I skipped over #18 on this side because of my previous screw-up.. .

Still turned out good. I used Contact Cement and Superglue for the very forward part that Bends around the Bow White Glue for the rest.

I was thinking to myself that in the next build, I’m going to shape some Balsa Wood between Bulkheads #1 and #2. I hate it when the Strakes go flat between those 2 Bulkheads. 🤔🙄😫

Just about closed
Small Gap left Starboard side

That piece of Wood jammed in there is my Pre-Bent Strake that I will shape to go into that hole…

Last Strake to go in
Clamping in Last Strake!!!

👍😆🎉

Strake Terminology

I do realize there is a whole other numbering convention for Strakes, but I just went with my own instead. It gets too confusing for me using Letters. 🤔🙄😲

Terminology

In boat and ship construction, strakes immediately adjacent to either side of the keel are known as the garboard strakes or A strakes. The next two are the first broad or B strake and second broad or C strake. Working upward come the bottom strakes, lowers, bilge strakes, topside strakes, and uppers also named sequentially as the D strake, E strake, etc. The uppermost along the topsides is called the sheer strake. Strakes are joined to the stem by their hood ends.

A rubbing strake was traditionally built in just below a carvel sheer strake. It was much less broad but thicker than other strakes so that it projected and took any rubbing against piers or other boats when the boat was in use. In clinker boats, the rubbing strake was applied to the outside of the sheer strake. Many current pleasure craft reflect this history in that they have a mechanically attached (and therefore replaceable) rub rail at the location formerly occupied by a rubbing strake, often doubling to cover the joint between a GRP hull and its innerliner. Inflatable dinghies and RIBs usually have a rubbing strake (typically a glued-on rubber extrusion) at the edge.

A “stealer” is a short strake employed to reduce the width of plank required where the girth of the hull increases or to accommodate a tuck in the shape. It is commonly employed in carvel and iron/steel shipbuilding, but very few clinker craft use them.

Transom

Rubber band Vise

I had to add some lumber to the Transom to bring the entire thing out in a Curve.

Shaped upper portion

I had to include this Filler Blocks because the Fillers for the aft section didn’t go out far enough.

Rubber Band Vise
Look at that gap… 🤔🙄

I’m not sure if I’m going about this the hard way…

I suppose I could have simply shaved the Poop Deck down a bit… 🙄🤔🫢

I am just thinking ahead… I’m sure the Planking will hide a lot of flaws. These ships were constantly being modified anyway, especially this one. It was supposed to have a beefed up hull to better withstand any ice that they encountered. 😲

Had to put fillers on sides
Cutting out Piece 22a
These Windows are a Monster to get out

Currently I’m using a Scribe to puncture miniature Holes in the Wood. I’m hoping to scrape the wood from the other side!

Had to use Punch and Dremel in that order
Gluing Stern Balcony

Shrouds Progress

I wish I had somebody to talk “Ship-Talk” with. Preferably an Old Timer who has been doing this awhile and who I can watch work.

Anyway… Lacking that… I do this blogging. I know… It’s not the same thing. But I also follow some really talented Model Makers in the Groups I belong to.

So, I’m looking at these Shrouds and I am beginning to suffer the “Modeler’s Regret”… You know… When you think that you should have done something a certain way???… I guess that’s the nature of it. I’m not going to redo it all. Definitely not. But I’ve seen guys who do it.

A prime example are the Seizing on Shrouds that wrap around the Deadeyes.

I started off like this…

Deadeyes on Fore Mast, which I started off on…
Deadeyes on Main Mast

I especially love the one all the way to the left. I wish they were all like that and uniform. Hmmm… 🤔🙄🧐

Main Mast Shrouds

Mast Hole – Foremast

One of the things I really like about having a blog is that I can really get into the minutiae of whatever I have going on. Making Posts on Facebook or Instagram or whatever, I always feel like I’m being a braggart or whatever. When in fact, the only thing I really want to accomplish with the blog is to have a record of my work. That being said…

Mast Hole – Foremast

While laying the planks down, I always wonder how I’m going to work around the Mast Hole. Of course everybody finds the solution best for them. Here’s mine…

Mast Hole and Mini Rat-tail File I have to be careful because this is my only one… 🤭

While laying down the Planks, I like to take and file down the Planks as they overlap into the Mast Hole. Not to wait until after they’re planked over and drill through it.

Drills tend to dig into and splinter the wood that is this light. Files work a lot better for this work.

Sanding and finishing Hull

As I’m into my 2nd day of sanding and making micro adjustments here and there, I was thinking to myself how I never rush this process.

I find that it helps to put it down and pick it up every once in awhile over the course of a few days before proceeding to the next step.

During that time, I’ve come to realize some of the shortcomings and disadvantages of Dap Weldwood Contact Cement. I’ll cover this more in a Post dedicated to it.

In the meantime, suffice it to say that I’ve made perhaps about a dozen or so repairs of Planks that didn’t retain their glue holds, which I’ve had since to repair with SuperGlue. Not to mention those annoying little Glue sprues.

One thing that I’ve found out from previous models is the danger of over sanding. You always need to stay aware of how much wood you have left under what you’re working on. Which is not to say that you can’t take it down to almost paper thin… But you want to avoid doing that just for the sake of preserving it’s structural strength.

Between now and when you’re done, the model will get handled quite a bit. Once it’s displayed though, there’s not much to worry about unless you have kids or cats.

Making the 2nd Layer Walnut Planks

I’ve been trying to figure out a method of making these Planks.

Everytime I build a new model… I go through the same thing. Trying to figure out another way / better way of making these things.

Alas… I think I’m stuck with my one at a time labor intensive method

It’s times like these that I with I had one of those Computer controlled cutters.

It’s not that I mind the labor, mind you. After all, that’s what it’s all about. I’m not trying to mass produce these Model Ships so why am I complaining?

I suppose it’s not complaining that I’m doing, because half the fun is the discovering of other ways of doing things.

Anyway… I’ve settled on a system and I’m finally going to write it down here for future reference… And for anybody else that might want to use it.

I figure out the template that I’m going to use. Basically, around 180mm from the end, I put a Pencil Mark at the 1/2 point in the width on the end. Because that’s how far it has to taper.

Mark at 1/2 way point

Then, I put a Clip on this Mark and use it as a stop when I stick it into my specially made Vise that I made for this work.

Put Clip right on Mark

I then use my Mini-Plane, holding it an angle… around 30° or so, I plane it down to that Mark. Then I also use some Sandpaper to make sure that I reached it.

I hold the Mini-Plane at right around 30° Angle to take off excess wood to Mark

After I take it out of the Vise, I use Sandpaper to get it down to the 2mm Mark.

Sand it down until you get down to Mark

One thing that I want to say as well… Make sure that you Mark off which way to the front and which way points down. Because I’ve found that these things are really easy to get confused… Really easy!!!… You don’t even want to know how many times I’ve mistaken up from down in these things and bent them the wrong way!!!

Make sure and Mark the direction to the Bow and also a Down Arrow
Pre-Bent Planks waiting while Contact Cement dries

Wales

Looking at the HMS Surprise this morning, I am just thinking that it’s almost ready for these Wales… Although I did make a few micro-adjustments here and there and a few areas of Puttying, which I have to wait until it’s hard before continuing. Of course they were around the Gun Ports. Besides I have to wait until morning to turn my compressor on to blow this ship before using the Contact Cement as to not disturb the neighbors.

Just waiting until the Sun is shining.
Bending Walnut around Jig
Pre-Bent Wales ready to go
Cracked Walnut Stock

The above two 2mm x 2mm were the ones that cracked on me last go around. What I did was to re-soak them for 2 more hours in 1/2 cup Ammonia to 1 cup Water in my Plank Soaker.

Then, I turned the wood 90° so that the wood would perhaps take the bend in that direction a bit better… I’ll tell you in a moment.

The 2 pieces I cracked… I turned it 90° to attempt the bend in that direction instead.
The one on the right cracked very slightly but it wasn’t too bad
Bending… I put that 2nd board on it to stop cracking on the one on the right.
Yeah… This bend came out clean!!!

Walnut Wales Bending

My first experiment produced a couple of Wales that were bend nicely however there were a few cracks in them…

Wales with cracks

I mean… They’re perfectly usuable, but I think that I’ll use them on the Lower Wales so that the cracks aren’t as visible.

That process was simply soaking for 1 hour in 1/2 cup Ammonia + 1 Cup Water in my Plank Soaker. Then bending it around my Jig.

This next experiment, I soaked the Wales for 2 hours or more. Then I carefully inserted the 2 Planks into the Jig and clamped them together with my little Clamp I made to keep them from turning like they did last time.

Then, I used some Clips to weigh them down and stress them gently into a bend… Instead of rapidly like I did last time.

I then used my Iron, set to Max with Steam… I gently went back and forth across it to make it bend.

Well… It bent pretty nicely I must say…

Gently bending with weight
Getting ready to bend 4 – 2mm x 2mm and 2 1mm x 4mm Walnut stock
Slow bending with my Jig
Walnut without cracks or breaks

Yeah… It seems like taking your time is the key with bending these Walnut stock.

I did manage to crack 2 of them… But I think that was just a matter of me sticking it in to get bend in the wrong direction. The wood didn’t like it.

You have to determine what the wood wants to do. Or else it will end up cracking on you.

First Layer Planking Finished

I was just going over everything with my 320 Grit Sandpaper and feeling for any irregularities to smooth down.

One thing that I’ve found over the years is that you shouldn’t be overly enthusiastic about sanding. You can easily over sand… Which is what happened on the Port side Forecastle Bollard, in which I sanded to thin paper!!!… Ugh Ugh and more Ugh!!!

Paper thin Bollard

So, what I had to do was to add another piece of Planking over it and Clamp it down in order to repair it…

Gluing Plank to outside of Bollard

I then Puttied and sanded it down to where it looks like this…

Repaired Bollard

Looks pretty good.

Then, I’ve gone through and sanded the entire Hull until smooth… Repairing little bits here and there.

I’ve often found that you need to take your time and really wait and feel around to make sure everything is right…

This was a hard lesson I learned recently with the distancing of the Gun Ports.

Well, the only thing I can do is to keep going. I was even thinking to myself that perhaps this little mistake will make me even bolder and more adventurous.

Perhaps it will?!!!… Who knows? 🤔🤭🤣