Tag Archives: Deck Planking

Main Deck Planking – Midship

I decided to create 3 different Posts for the Main Deck Planking.

What I did for the Planking is to divide the Ship into 3 different sections… Forecastle, Midship and the Poop Deck.

It sure makes it easier when you’re trying to line up the Planks having 3 different sections.

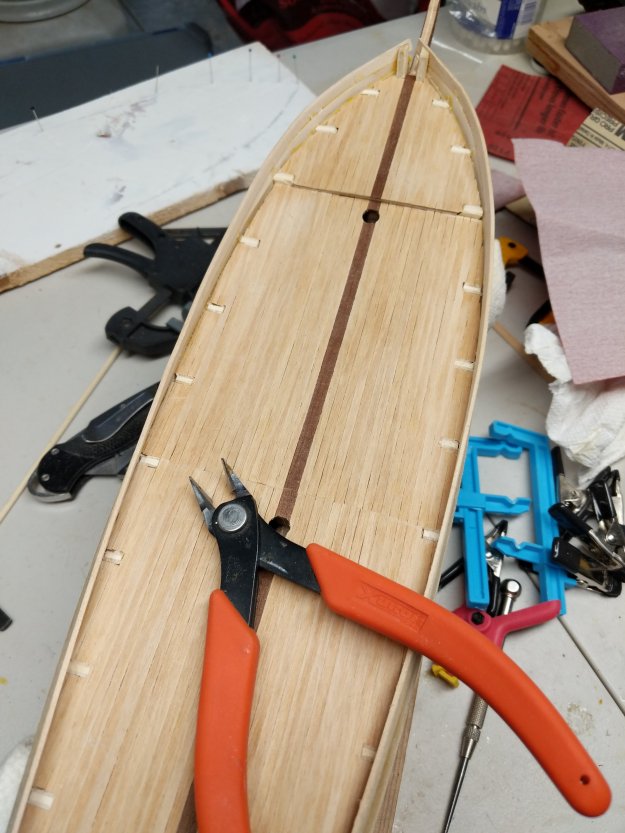
Anyway… Here’s the Midship Planking so far…

Notice the Midship aligns differently from the Forecastle… 🤔🤭😲

Notice that I have one long Strip of wood on the Port side of that set of Planks next to the Hatch? I cut it with my Mini Table Saw.

Micro Mark Mini Table Saw

The Glue that I use for Deck Planking is Titebond II and occasionally SuperGlue for repairs.

I find that these Planks in the middle… You can’t really mass produce them as others. Well… You can, but I find that often you have to do a custom fit job so those mass produced planks need to be cut one way or the other.

Anyway, what I’m trying to say is that I Measure, Cut & Scribe each plank individually.

Treenails on Deck Planking

I was looking at one of the guy’s Post on my Model Ship Building Group you’re of the HMS Beagle. Anyway, I asked him whether his decks came pre-Scribed and with Treenails. He hasn’t answered me yet. However, that got me to thinking about Treenails on my own decks!…

The guy’s HMS Beagle decks scribed with treenails

Hmmm… Is it worth it on a 1/75th scale model?

Anyway… I’m going to put this link here and in my Techniques Page for future reference from Modelers Central.

After much consideration… I’ve decided not to Treenail the Deck Planks

The main reason being the Scale… I’m thinking if it was like 1/40 Scale, I probably would.

Mast Hole – Foremast

One of the things I really like about having a blog is that I can really get into the minutiae of whatever I have going on. Making Posts on Facebook or Instagram or whatever, I always feel like I’m being a braggart or whatever. When in fact, the only thing I really want to accomplish with the blog is to have a record of my work. That being said…

Mast Hole – Foremast

While laying the planks down, I always wonder how I’m going to work around the Mast Hole. Of course everybody finds the solution best for them. Here’s mine…

Mast Hole and Mini Rat-tail File I have to be careful because this is my only one… 🤭

While laying down the Planks, I like to take and file down the Planks as they overlap into the Mast Hole. Not to wait until after they’re planked over and drill through it.

Drills tend to dig into and splinter the wood that is this light. Files work a lot better for this work.

Main Deck Planking – Forecastle

Here’s the Main Deck before I start…

Main deck

First thing in going to do is to remove the Bollard guides that come up from the Bulkheads.

Here’s a good Article about how to do it at Modelers Central…

One thing you have to do with deck planks to simulate the caulking that’s in between each plank using like a number 6 b pencil and what you do is you get a few and then you scribe a bunch of them at once. I’d say maybe you like 5 80 mm long planks and just put them on a clip and just use a pencil across them all. I made the mistake of doing it one at a time and it’s better to get a bunch at once.

1st Row done
I’m debating to leave this little gap in the Waterway… Hmmm… 🤔

Using Razor Blades to Remove Guides

I messed up a bit. I put the Deck Planks in before I took the guides out. I should have waited so that the Planks will cover the Stubs where the guides were. Well… I’m not going to worry about it. There will be so much going on that this descrepancy would be hardly noticiable.

Anyway, I used one of those Scalpel looking Xacto Blades to remove the guide stubs until I noticed that I was scraping the Deck with the side of the Blade. So, I switched to those Wood Chisel looking Blades.

After I got about half way through using various Xacto Razors… I realized that it is a lot easier simply to use my Sprue Cutter.

Deck Planking

Before installing the Transom… Which is basically ready to be glued in, I decided to go ahead and put in the Deck Planking.

This will save me work later on because I can simply take off the excess of the Deck Planking that goes over instead of having to measure them out.

I will go with 80mm Sections for the planks and I’ll “color” the sides in with my Pencil… Giving it a more worn and weathered look.

Bare Deck before Planking
.6 x 5mm Mohagany Plank in the middle
Begin Bow
Continuing Planking Main Deck
These little ones one the sides are a bit of a pain
Working on the Poop Deck
Work progresses…
I typically work on it on my lap

Mamoli Insructions #2

2) Set firmly the deck 19 on the structure and glue it, fix it with little nails driven only for half of their length (so as to take then) out afterwards) in correspondence of the keel and of the frames, near the joints. Reinforce the parts glued, where the deck fits into the frames, flying some pieces of the strip, if that is the case. Trace a line along the centre of the deck, then, starting from the marking and going on towards the sides, glue the planking 20 so as to sheathe completely the deck. Smooth the surface with sand-paper. The planking consists in pieces of strip 80 mm. Long, glued staggered: their side must be blackened with a pencil, to mark the separation between the boards (fig. 2).