I have been touching up with the Sanding and looking at the bare sanded ship now for a better part of two days. .. Thinking about how the next stage is going to go. 🙄🤔
Blank 1st Planking
This next Stage is pretty interesting but it takes a bit of preplanning.
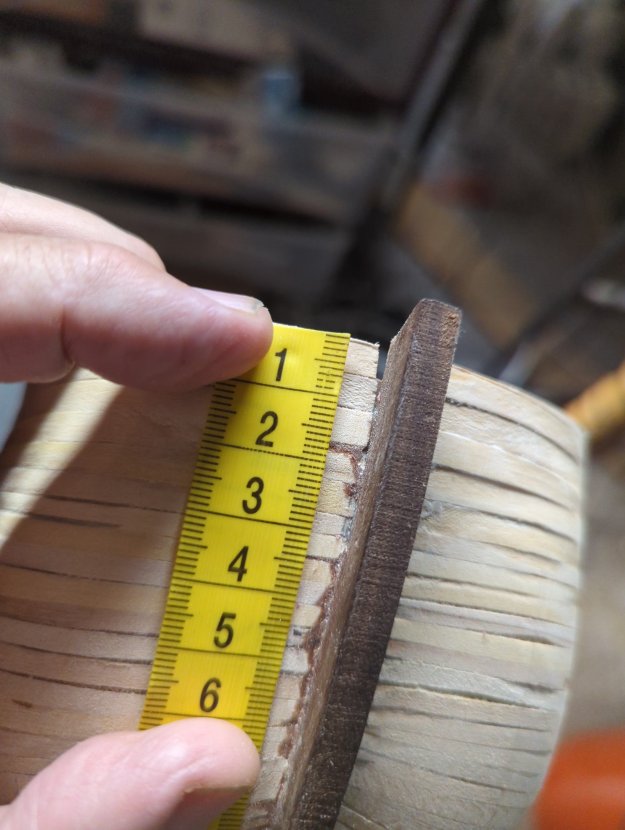
First, I have to determine the line where the Wale, aka Rubbing Strakes, is going to run.
46mm to the top of the Wales
From the top of the Forecastle Bulwarks to the beginning of the top of the Wales is 46mm.
Temporary Wale with PinsStarboard side Temporary Wale
I did take some measurements but mostly I did it by eyeballing it and gave the Wale a nice bend to make it look more rakish and nautical.
I’m beginning the masking off and painting of the mid-section of the Hull from the Waterline to the first set of Wales going up.
Using my thumbnail to really push down on the Masking tape so I don’t get any bleeding into the White HullMid-Section complete
I’ve got to only paint the rest of the Stem to be finished with the painting for now. I’m glad how it turned out. I used my Thumbnail to really push down on the Masking Tape so that kept the black paint from bleeding into the White. I did have a couple of minor spots but not anything that is noticeable. You have to be careful with Black. The White Paint for the Hull, I put on 6 Coats because it is so transparent. But the opaque Black, I only used 2 coats.
I forgot to mention the type of paint I used. I’ve had pretty good luck with the stuff I buy from the Michael’s, the craft store. I simply buy those little bottles of them. The black I used is called Beetle Black. The white is Titanium White. The brand is the Martha Steward Craft paint. I mean… if you want, you can order paint from like Model Shipyard or MicroMark or whatever, but in my opinion, they’re no better or worse than this Martha Steward stuff. What is paint anyway… but paint? Very overpriced in my opinion, but that’s probably the price you have to pay to have the small bottles and different colors available.
Also, another thing I noticed was that these bottles force you to “squeeze” the paint out into some sort of container. I use discarded plastic salsa cups. Every time I go and get Mexican food, I make sure and save those little salsa cups. Anyway, the paint you squeeze out, a lot of it goes to waste. So that’s another way that they make money off of you.
Martha Steward paint and plastic Salsa cupsStarboard side
First thing I did was to draw a line 8mm down from the 3mm Walnut Strake that was just above the Sheer Strake.
This Walnut Strake is what the Guns rest against on the Gun Ports.
3mm Walnut Strake just under Gun Ports
Next thing, I File the Angles in for the Strakes that are going to rest against the Stem and Prow.
What I do is Mark it with a PencilContact Cement applied
You wait between 15 Minutes to 2 Hours and you can press the 2 together.
First Set of Wales and Sheer Planks attached
The Dap Weldwood Contact Cement works great for this work!… Although I did have to use a dab of SuperGlue to secure the very front of the First Sheer Plank.
Had to use SuperGlue for very frontFirst set of Wales
I purposely didn’t glue the two 2mm x 2mm Pieces of the Wales together in order give it that Wale look… What’s the point in using two 2×2 if you’re not going for the separation look? Otherwise you would just use a couple of 2×4’s!
Looking at the HMS Surprise this morning, I am just thinking that it’s almost ready for these Wales… Although I did make a few micro-adjustments here and there and a few areas of Puttying, which I have to wait until it’s hard before continuing. Of course they were around the Gun Ports. Besides I have to wait until morning to turn my compressor on to blow this ship before using the Contact Cement as to not disturb the neighbors.
Just waiting until the Sun is shining.Bending Walnut around JigPre-Bent Wales ready to goCracked Walnut Stock
The above two 2mm x 2mm were the ones that cracked on me last go around. What I did was to re-soak them for 2 more hours in 1/2 cup Ammonia to 1 cup Water in my Plank Soaker.
Then, I turned the wood 90° so that the wood would perhaps take the bend in that direction a bit better… I’ll tell you in a moment.
The 2 pieces I cracked… I turned it 90° to attempt the bend in that direction instead.The one on the right cracked very slightly but it wasn’t too badBending… I put that 2nd board on it to stop cracking on the one on the right.Yeah… This bend came out clean!!!
My first experiment produced a couple of Wales that were bend nicely however there were a few cracks in them…
Wales with cracks
I mean… They’re perfectly usuable, but I think that I’ll use them on the Lower Wales so that the cracks aren’t as visible.
That process was simply soaking for 1 hour in 1/2 cup Ammonia + 1 Cup Water in my Plank Soaker. Then bending it around my Jig.
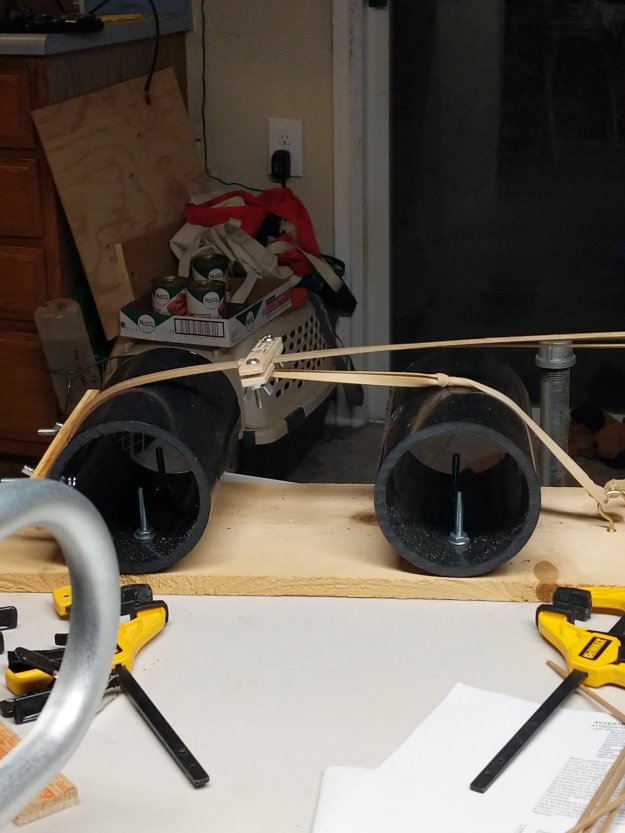
This next experiment, I soaked the Wales for 2 hours or more. Then I carefully inserted the 2 Planks into the Jig and clamped them together with my little Clamp I made to keep them from turning like they did last time.
Then, I used some Clips to weigh them down and stress them gently into a bend… Instead of rapidly like I did last time.
I then used my Iron, set to Max with Steam… I gently went back and forth across it to make it bend.
Well… It bent pretty nicely I must say…
Gently bending with weightGetting ready to bend 4 – 2mm x 2mm and 2 1mm x 4mm Walnut stockSlow bending with my JigWalnut without cracks or breaks
Yeah… It seems like taking your time is the key with bending these Walnut stock.
I did manage to crack 2 of them… But I think that was just a matter of me sticking it in to get bend in the wrong direction. The wood didn’t like it.
You have to determine what the wood wants to do. Or else it will end up cracking on you.
I was just going over everything with my 320 Grit Sandpaper and feeling for any irregularities to smooth down.
One thing that I’ve found over the years is that you shouldn’t be overly enthusiastic about sanding. You can easily over sand… Which is what happened on the Port side Forecastle Bollard, in which I sanded to thin paper!!!… Ugh Ugh and more Ugh!!!
Paper thin Bollard
So, what I had to do was to add another piece of Planking over it and Clamp it down in order to repair it…
Gluing Plank to outside of Bollard
I then Puttied and sanded it down to where it looks like this…
Repaired Bollard
Looks pretty good.
Then, I’ve gone through and sanded the entire Hull until smooth… Repairing little bits here and there.
I’ve often found that you need to take your time and really wait and feel around to make sure everything is right…
This was a hard lesson I learned recently with the distancing of the Gun Ports.
Well, the only thing I can do is to keep going. I was even thinking to myself that perhaps this little mistake will make me even bolder and more adventurous.
Here I’m trying to bend these 2mm x 2mm Walnut Wales after I had it soaking in hot water with Ammonia for about an hour.
Bending Walnut Wales
I’m not too happy about how it cracked the outside of it… Perhaps for the next ones I’ll soak them for a lot longer maybe.
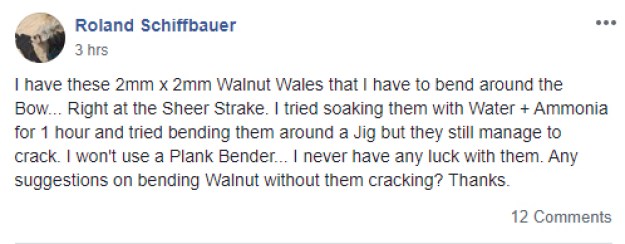
I submitted a question to my Model Shipbuilding Group which went –
You should see all the answers. One of them did make sense… which I’ll try next.
I’m soaking the Walnut 2mm x 2mm stock for extra long. Then, I’m going to slowly bend it, but this time I’m going to use a couple of clamps across the Walnut and bend it extra slowly while applying heat to it using an Iron. I was thinking about using my Plank Bender Heater… I’ll try that next.
That’s one thing that I love about this hobby is going through these different types of experiments to see what works…
I’ve been sanding the Hull so that the Gun Ports are flush with the Hull sides.
The line of the Hull above the Wales have a concave nature to it, so I’ve been trying to get it even…
But to my constirnation, I made another error when I was a bit too enthusiastic with the sanding and I over sanded the Bollard on the Port Side of the Forecastle… Ugh… I hate when that happens! I should have known better. At least I stopped soon enough so I have something to work with when I do my secondary Planking.
Over sanded the Bollard
I put Putty on all the parts that had flaws or holes in it…
Putty… Port sidePutty… Starboard side
The over-sanded Bollard is completely saveable. Because there still requires a Caprail and Handrail at this part.