Category Archives: Philosophy

The Zen of Sanding

As I sit here, listening to my favorite Bach B Minor Mass performance by the Van Veldhoven Netherlands Bach Society, I was thinking to myself about how the act of Sanding the wood is very cathartic and relaxing.

I guess Leroy Jethro Gibbs has the right idea about it as he builds his boats down in his basement.

I used some Tamiya Wood Putty to fill in holes
Almost done with this layer
I cut out the part where the Rudder Gudgeons are going to fit

Bulwark Top Part

This is the part where I messed up. I should have come up higher on my initial Plank. Short of redoing the entire thing, I’m going to make a filler Plank for this gap.

Making the to Starboard Bulwark Plank take the bend

This is one thing that I love about this hobby. Because when you run into situations, you have to do what the Marine Corp doctrine dictates… I.A.O. Improvise Adapt & Overcome

Anyway, while driving to my doctor’s office, I thought of a way to make a template for making the filler Plank. I’m going to use a big piece of clear Scotch Tape and trace the gap onto it. Then, I’m going to bend the Plank around a Jig that I made and once these wood takes the bend, I’ll simply last the tape on to the wood and trace around it and sand it down to fit.

I put a piece of Scotch Tape across it to make a Template

Mind you… This is all experimental. I’m in the process of repairing this Gap by making this shape of internal Plank.

Bulwark

I’m starting on the Bulwarks. The Bulwarks are the side of the ship that comes above the deck.

I kind of feel like I messed up in installing the first Plank so now I’m going to have to compensate for it with some corrections.

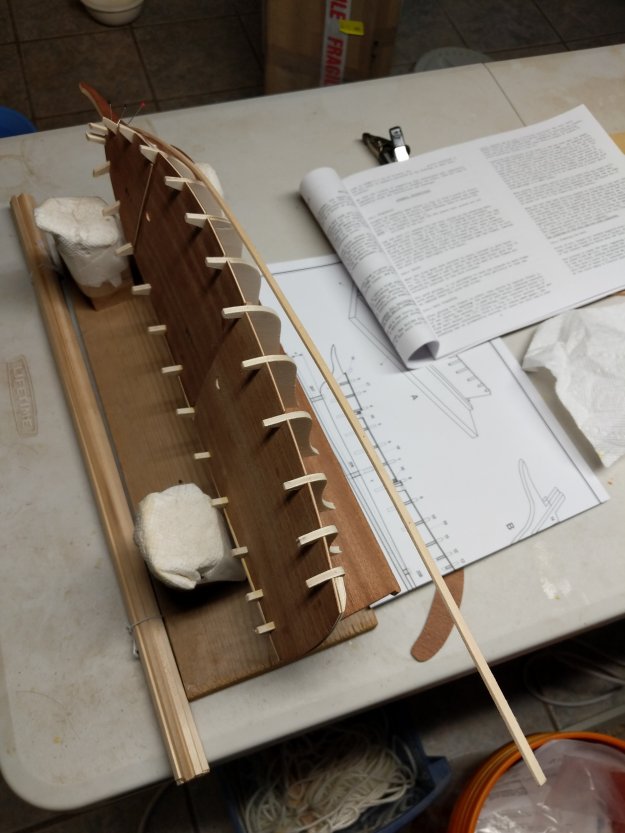
I first bent this first Plank in with soaked plank wood 1.5mm x 5mm.

Now I taped off the guides going along the Gunwale so that the glue doesn’t stick to the Bulwark because I’ll be removing these guides once the Bulwark are up.

Rubber bands to pull it in at an angle and to hold it in place
Port side Bulwark taking bend
The bend took nicely… But I had it on here for about 12 hours
The Port side fit in very nicely

So… I’m kind of dreading the next step actually. What happened was the I didn’t come up and over with the initial Plank on to the Forecastle Deck. Now I have to do a funky fix… Which really wouldn’t be visible anyway. It’s just I wish u would’ve gotten it right the first time. Oh well. Live and learn. It just seems a bit Amateurish.

But hey… I never claimed to be an expert anyway! 🤭🤣😲

Planking Routines

I find that once I find a good routine to do, it’s kind of a pleasant feeling.

What I mean is that right now, I’m on a Planking Routine.

1. Soak or Steam the Wood.
2. Bend the wood around the Hull.
3. Wait for it to dry.
4. After drying, Glue the Bow portion after releasing tension.
5. After the glue dries, glue the rest of the Plank in.

While that’s all going on… I can have another piece of Wood soaking or whatever.

Here the tension is released and I’m waiting for the glue to set.

So, as you can see, all these steps take quite a while. It’s not a hobby for the impatient. As I’ve said many times before, it’s really not about the finished product. Once it’s done, I’m done with it. It’s about the building of it and the concentration it takes. Also, it’s a great feeling when I managed to get something exactly right. I guess that’s probably true in any Wood Working Art.

After the glue on the Bow has taken and grabbed, I then bend in the Plank and clamp it all down with a combination of Clamps and Pins.

Had to make sure it was glued flush.

There you go… Now I have to wait a few hours.

Filing the Frames on the Bow

Here I’m filing the Frames on the Bow to line up flush with the line of the Deck. In the hopes that the Planks will “fair” well. (which means lines up)

Fair, Fair Lane – A continuous smooth line without kinks, bumps, wobbles, dips or hollows to distract from its course.  

I find this process to be quite soothing. It takes a lot of patience and nerve. Because I’m constantly worried that I’m messing up the entire thing.

It’s kind of an exercise in forward-thinking as well and it helps in keeping the mind motivated and active.

But here’s the thing… You have to file these frames smooth so that they line up with the Deck and the fair smoothly and there aren’t any bumps . You have to do this part mostly by eyeballing and feel.

Zen of Building

This Category, which I call Philosophy is going to be about my random thoughts as I build.

I broke out the kit and started reading the Instructions. I was surprised to see that the Instructions were in pretty good English. My experience with some of these Kits is that they have written the Instructions in this cockamamie English that is often difficult to understand.

In my Mamoli Kit from before, the HMS Surprise was like that. I will get back to that one once I complete this one and gain more experience with Period Ships. The Mamoli Kit was a Ship from the 1800s and this one is from 1860, so I’m working backward in time.

At the risk of being overly sentimental, I’m going to be writing down some of my introspective observations. A lot of it will be a bit of a “stream of consciousness” I suppose. But I guess, as a Seaman, you often do a lot of thinking while on Voyages on the Ships so it’s not too much different from that.

So, I immediately encountered a “problem”. But, I don’t think “problem” is the correct word. I like to think of them as something that needs to be solved.

The Bulkhead Slots were all pretty much too narrow for the width of the Keel. So now, I’m having to use my Dremel to widen each and every one of them.

That’s what gets me to this thought… Is the “Why”??? Why would I do this??? What do I find fascinating about it?

Well, for one thing, the intense concentration on one thing is pretty relaxing for me. Also, I like to listen to Classical Music while I work so there’s that. If I don’t have something to do, I tend to not just listen to Music.

Gun Deck Planking

I was trying to be as careful as I can be, but I keep messing up a bit.

One thing that I’ve been doing is to smudge the top surface of the wood with a combination of Wood Glue (Titebond II) and Graphite from my Graphite Pencil which I’ve been using to mark the sides of the wood to define it from each other.

I do quite like the effect that it gives the Deck. Sort of a rustic rough appearance that seems to comport with pictures that I’ve seen of ships of this era.

But, what happens is that as I work on it, I end up getting bits of glue on my fingertips and that in turn mixes with the graphite and creates these tiny black splotches. I’ve taken to getting up and washing my hands every few minutes in an effort to avoid making this mess.

Those little black spots are what I’m referring to. It’s really not that big of a deal but I am trying to avoid making any mistakes as much as I can.

Another mistake that I made was that I ended up getting misaligned. I didn’t notice until it was too late and I wasn’t about to pull out the Planks until I got to the offending one, which probably would have been difficult to find.

I ended up stopping the Staggering and just starting with a new row. It’s barely noticeable and besides this is a lower deck and won’t be that noticeable. Although, as luck would have it, I ended up starting this new row right where the Deck opening for the Lifeboat will be located. Oh well. I’m not worried about it, although my OCD Side has a difficult time of allowing me to accept it, but I’ve since learned through experience that you just have to shrug it off and keep going.

See how the line goes straight across?

Just finished the Line that goes straight across. I had to make a few notch-cuts along the way. Sort of felt like one of those Rock Cutters from Machu Picchu.

Really though??? Somebody would have to look really closely at in order to spot this mistake.

Excerpt from Ship Modeling from Stem to Stern

I was reviewing a few of my Books on Ship Modeling. I’ve now accumulated a few. One of my latest ones is called Ship Modeling from Stem to Stern. I’m really enjoying reading this book because a lot of what he talks about is very relatable to me because a lot of what he talks about are the same things that have ran through my head as I build these Models.

Anyway, here is an excerpt of him talking about Model Kits and Instructions –

The makers of ship model kits have perverted the term plank on frame. In reality, they should tell it like it is : plank on bulkhead. This version of the built-up ship model is not constructed with built-up frames. The “frames” are plywood bulkheads. In some kits, the outlines are simply printed on the plywood. In others, they are die cut, while in a third they are cut out and almost completed for you. All are notched for assembly. Of course, the more labor involved the higher the price.

The number of bulkheads included in the design of these kits is in my opinion and I believe the manufacturer’s, sufficient to ensure the shape of the hull. The kit designer often will use as few as possible to save on the cost of the material, especially in the less expensive kits.

The planks —thin wood strips— are to be placed over the bulkheads to form the hull. Again, depending on the designer and the cost of the kit, the planking might be a double layer of thin strips or a single layer of thicker strips. The double planked hulls use a less expensive wood for the first layer. This under-layer is to be covered with a thin “show” wood. The completed model results in a hull that is completely covered by planking. It is a built-up hull. All mistakes and errors of construction and patching can be concealed under the planking.

The sharks of commercial salesmanship have convinced many a potential model builder that it is a “breeze” to build a plank-on-bulkhead ship model. It isn’t. Many a model has been relegated to the closet shelf while the builder gathered courage. To this day many are never finished.

The majority of kits of the plank-on-bulkhead variety are imported. The basic instructions, translated into English, are sometimes laughable; and often misunderstood. This is perhaps the reason for the profuse illustrations. You might not speak or read the language, but you can follow pictures. Building a model by following the pictures is the rule, rather than the exception.

Milton Roth, Author of Ship Modeling from Stem to Stern

Okay, I totally agree with this author. On my last model, the Belem, it was almost totally pictures. Very few written instructions. That kit was by Artesania Latina, I believe they’re out of Valdáliga (Cantabria) Spain.

I found their instructions to be quite easy to follow.

On this Mamoli Kit however for the HMS Surprise, their English is terrible and they don’t really give you all that many illustrations either. Just one 3 dimensional Picture per step. I had to figure out a lot of things on my own. Perhaps that’s something that is intended with Model Ship Building. To learn about the Ships as you proceed. Anyway, I am driving on even though sometimes it seems intimidating. That’s all part of it. To see if you’re up to the task.

Square Rigger thoughts…

I just realized something this morning that I have never given much thought to. As I build this ship, particularly now that I’m into the Riggings, I’m coming to learn more and more how a Sailing Ship works. My last Model was actually a Boat. And a Fore and Aft Rig at that. This Ship is my very first Square Rigger. I must confess that I had very little understanding about how these ships work until now. Which is one of the reasons that I began to build this model and modeling in general.

For me, it’s a pretty relaxing hobby, I must admit. Anyway, as I’m proceeding up the Main Mast, I’m starting to realize that these Sails were mainly controlled from the Deck. The men climbed them, of course, but mainly to secure the sails once they became fixed in the closed position. I imagine a lot of people simply assume that the men climbed up the riggings and out into the yards and were doing the pulling of the sails with their hands. Which simply wasn’t true. It just seems that way especially how they’re being portrayed in the movies. The sails are being pulled up or in by the Clewlines and Buntlines. Also, there are other lines which are used to lift the Yards up and down. Of course, there are stays which are used to control the angle of the sails. On my next build, the HMS Surprise, I’m going to pay more particular attention to that detail. Because these lines are supposed to come down to a particular position and Belaying Pin. Which makes sense if you think about it. That way the men would know exactly which line to un-secure and secure in order to control a particular sail.

Anyway, these are some of the things that occur to me while I build.

Just attaching all the Running Lines, Clewlines, Buntlines for the Main Upper TopSail.

Thoughts as I near completion

I was reading some of the Posts in one of my Model Shipbuild Groups on Facebook. Well, this guy was working on this really small project. I mean, it was such a tiny scale that I believe the guy needed some great optics in order to work on it.

Anyway, he commented that as he was nearing the completion of his project, he was beginning to experience sadness.

I didn’t comment on his comment, perhaps I should have? But I thought maybe I’ll just comment on it here.

I can relate to how he feels. As I’m nearing completion, I’m beginning to feel that same sort of sadness and somewhat melancholy feeling myself. Of course, I do feel that tendency anyway with most of my art projects. I often go through a period of melancholy after I complete it. I’m pretty sure that I’m not alone in experiencing that emotion as many artists can probably relate.

Well, I’m climbing up the Main Mast now. I’ve completed the Sail and Yard for the Main Course. All I have to do is to tie off the Sheets. I’m waiting on that part until I have all of them ready to tie off because I may have to do some things that may be required as perhaps “cheating” because I from a practical standpoint, I simply cannot reach the places I need to reach to be able to adequately tie off the line to the Belaying Pins! I tried all kinds of stuff yesterday on this one line with a lot of frustration! And for what? I wonder how many people will actually look at it and admire the work that I did on it? Probably not many.

So, from that standpoint, I’m going to cheat a bit in order to achieve my goal. I do want to begin my next project. Although, I’m not sure whether or not I’ll take a bit of a break or not before beginning the new one. I might do some Watercoloring just to relax a bit. I have been thinking about taking on some more Wave dynamic artwork. I was talking to my friend Pauline about it yesterday. About being able to capture Wave action.